Do you have different types of content except for the pages and posts (default post types), and want to manage them in your own way? Then you can create a custom post type and its custom taxonomies.
The custom post types could be anything like Movies, Books, News, and custom taxonomies of them could be variations of it. Suppose you have a Movie custom post type and so custom taxonomies could be Genre, Languages, Quality, etc.
In the last article, we learned about how to create a custom post type? You can check this tutorial for a quick view of the registration of custom post types.
So in this tutorial, I will show you how to create a custom taxonomy for the post types in wordpress. We will learn two methods to register the custom taxonomy, one with the plugin and the second programmatically without the plugin.
What is WordPress Taxonomy?
A WordPress taxonomy is a way of grouping the posts to make a good structure for large amounts of posts. It groups together based on the relationships and you can add in a group as you want.
By default, WordPress has three taxonomies are called categories, tags, and post format. Categories as hierarchical and tags as non-hierarchical taxonomies and post format is like a method to set the format of your post but it’s no use in most. So, you can easily group your posts based on these three taxonomies.
WordPress default taxonomies
- Categories: this is a hierarchical taxonomy
- Tags: this is a non-hierarchical taxonomy
- Post format: this is a method to create your post format
So WordPress standard posts come with two taxonomies categories and tags. But these two are not well fit for all types of content.
Suppose you have a custom post type ‘courses‘, so categories and tags do not make sense for this post type.
So in that case you have to register your custom taxonomy for your custom post type.
For example, you have a ‘courses‘ custom post type and you want to filter them based on the course type, faculty, and duration, or anything else that you want. So you need to create them as taxonomies of ‘courses’ post type.
Taxonomies could be hierarchical or non-hierarchical. In the hierarchical taxonomies, you can have main types and others will be sub-types under the main types.
For example, you have ‘course type’ taxonomy then further it would have ‘Web Development’, ‘Affiliate Marketing’, and ‘SEO’.
So let’s start the tutorial to learn how to create a custom taxonomy in WordPress. I explained in one-by-one steps so you can easily understand each step.
How to Create Custom Taxonomies in WordPress
As I mentioned above you will learn two methods to create (register) custom taxonomies in WordPress.
In the first method, we will create with the plugin and in the second method, we will do programmatically using the functions.php file without any plugins.
Method 1: Create a Custom Taxonomy – with plugin
Using a plugin to register the custom taxonomy in WordPress is the simplest way and if you are a beginner and don’t know much about coding then this method will be easy for you.
So there are many plugins that you can use to create your custom taxonomies for your custom post type. The following list is the best plugins to create custom taxonomies.
- Custom Post Type UI
- Toolset Types
- Pods
- Custom Post Types and Custom Fields creator – WCK
- Custom Post Type Maker
These plugins also help to create your custom post type. These have a very user-friendly interface and you can easily create and edit them.
Note: If you have deactivated or delete the plugin then you cannot access your custom post type or taxonomies but your data still exist stored in the WordPress database.
Ok, let’s create the custom taxonomy with a plugin. We will use Custom Post Type UI plugin in this tutorial. You can use what you want.
First of all, you need a Custom Post Type UI (CPT UI) plugin installed in your WordPress setup. If you have already installed this plugin then you can continue on to the next point and if you haven’t installed it then please install and activate it using this guide on how to install a WordPress plugin?.
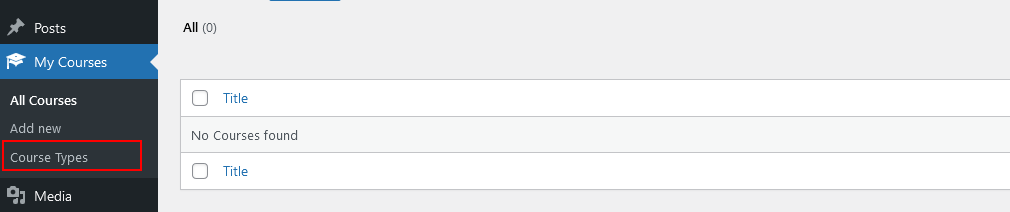
When you finished the installation, you will see a new menu item (CPT UI) in your admin dashboard. So navigate to CPT UI > Add/Edit Taxonomies. It will show you the screen like the below image.
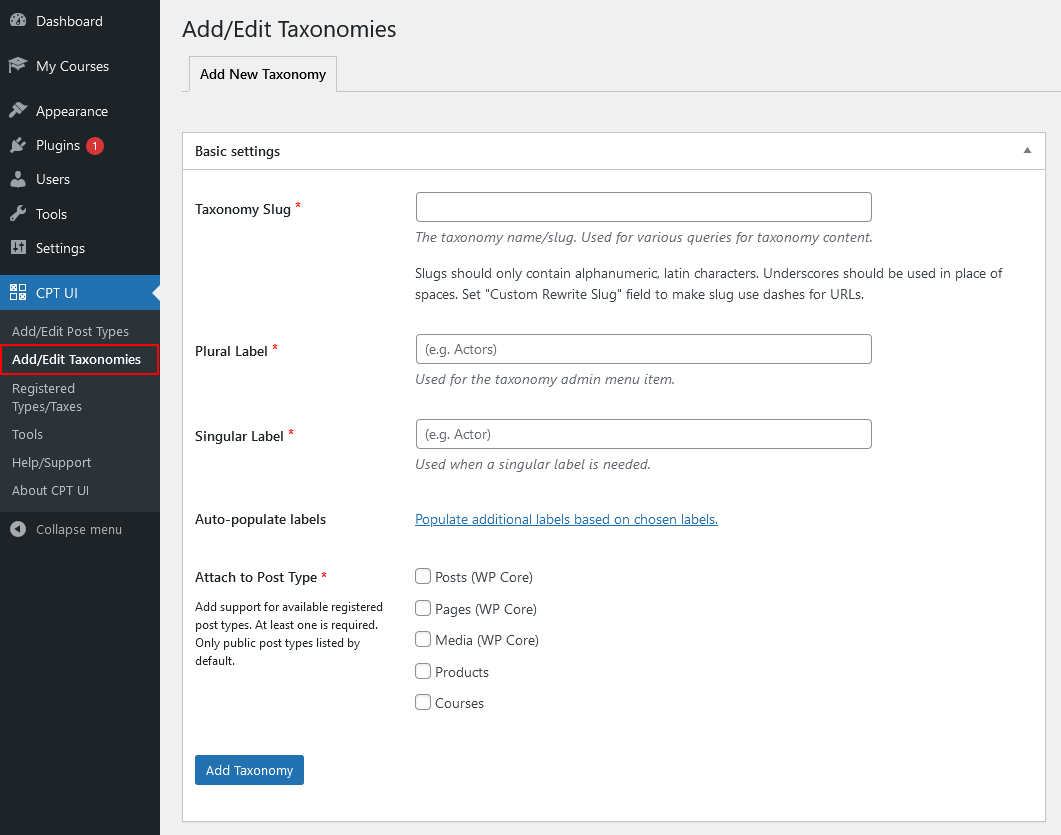
In the above image, you will see the first field under the Basic settings is Taxonomy Slug. This slug will be used in the URL and by using this URL path you can see all the posts under this taxonomy.
So, as according to this tutorial how to create a custom post type in WordPress, we will take the taxonomy slug is ‘course_types’.
The next fields are Plural and Singular labels of taxonomy. These fields will be the name of the taxonomy and we will take ‘Course Types’ and ‘Course Type’ respectively.
After it, you can auto-populate your taxonomy labels from singular and plural labels under the Additional label section. You can also add all the fields by yourself.
So, the next option about Attach to Post Type, means which post type that you want to attach with this taxonomy. You will see all existing post types listed as checkboxes. So you need to just check these post types option that you want to be attached.
Now, the next step is Additional labels. You can fill all the fields with the perspective label name. Or you can fill these fields automatically, as I said earlier. You just have to click on the Auto-populate link then these fields will auto-populate using the plural and singular label.
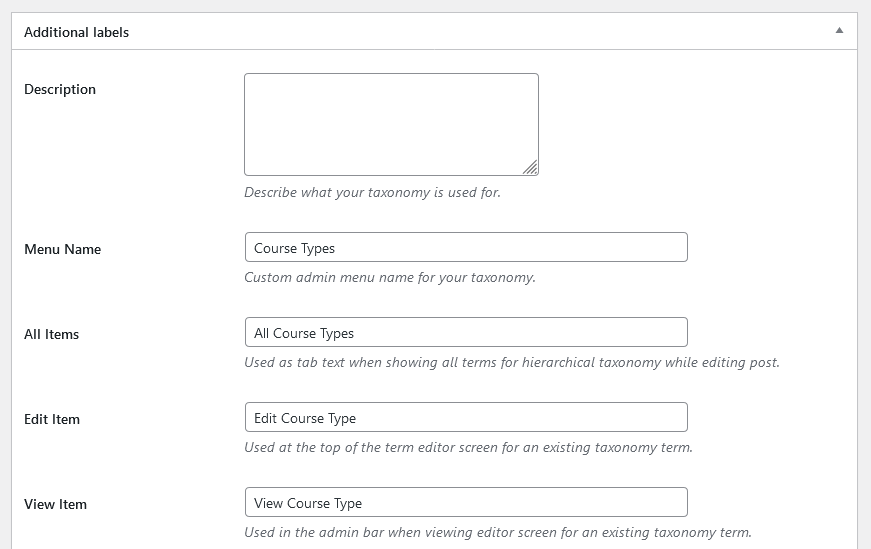
These labels fields will use in WordPress when you are adding/editing or managing the content of that particular taxonomy.
Next, you can see the Settings section about the taxonomy. You can set up these settings as per your requirements. Each option explain next to it what it will do. So read the brief description about the field and set it up as you want.
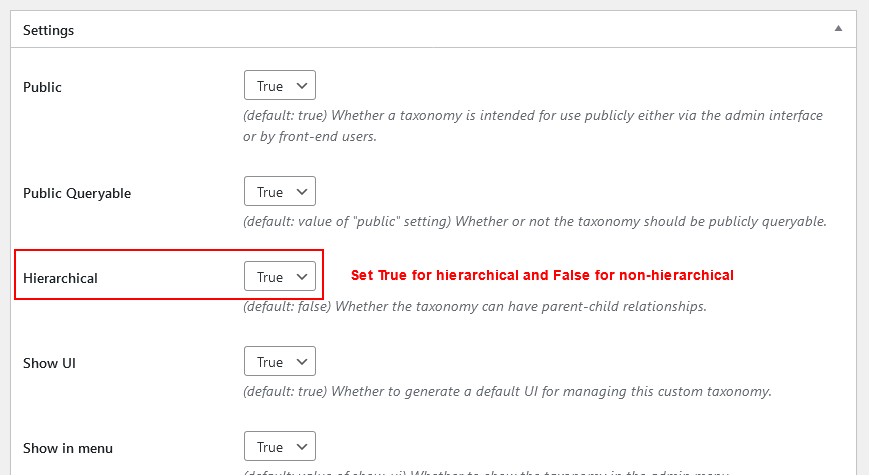
In the above image, you can see that I set up True to make this taxonomy a hierarchical taxonomy and it will work like standard posts categories (parent-child relationship).
You can make this taxonomy as non-hierarchical taxonomy work like posts tags by setting that field as False.
So, we made this hierarchical taxonomy, which means this taxonomy will have a main course type and the other will have a sub-type under each course type.
There are more settings about the shown in admin UI, shown in nav menu, delete with the user, has archive page, Hierarchical for the parent-child relationship, show in the admin menu, menu position, menu icon, and what will support the post type be, and etc. Read the description about each field and set it up as you want.
OK, when you finished with all settings then now you can click on the Add Taxonomy button to create a custom taxonomy.
Now you can see the new custom taxonomy under your post type. As the tutorial case, we made a custom taxonomy for the ‘courses’ custom post type, which you can see in the below image.
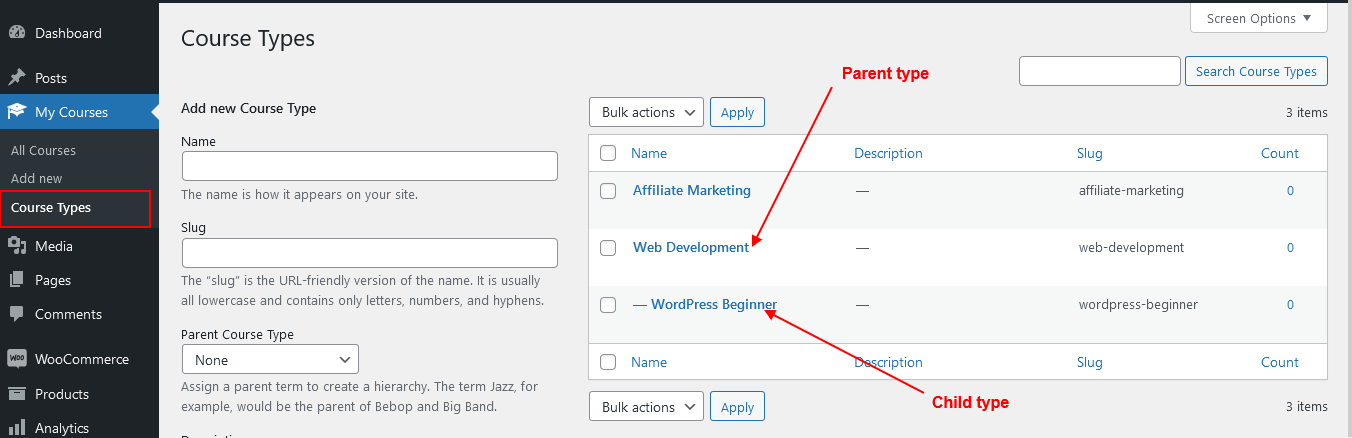
Hope you have successfully created your custom taxonomy. Now you can group your Courses using this taxonomy of ‘Course Types’.
Now, we will see how to create a custom taxonomy manually in WordPress using the code in the functions.php file. I would recommend using the child theme’s functions.php file for any customization. For details, see a tutorial on how to create a child theme in WordPress?
Method 2: Create a Custom Taxonomy Programmatically – without plugin
In this method, we will create a custom taxonomy without using any plugins. We will use the functions.php file to do all coding to register the custom taxonomy and will register_taxonomy() functions for this purpose.
As I said at the starting of the tutorial is that you will not access your custom taxonomy or custom post type that you have created with the plugins. But if you register your taxonomy using this method then you will not lose access to your taxonomy until you delete that code.
To create the custom taxonomy without plugins, follow the below steps.
- Nagigate to your functions.php file and open it.
- Make a function with the array of all the lables and settings options
- Then use the
register_taxonomy()with passing the all labels and settings options as an arguments - Finally, make a ‘init‘
add_action()hook to register the txonomy on the initilization - Save the file. That’s it!!!
So these are the steps to create the custom taxonomy for your custom post type. Let’s look in-depth to explaining each point and register our taxonomy with example code.
Hierarchical Taxonomy
In the first step, you need to open your functions.php file, so navigate this path wp-content/themes/your_active_theme/functions.php and open it.
Add the following code in this file at the end of the file. And replace the taxonomy name and labels as per your requirements.
Don’t forget to save your functions.php file. After saving you will see the new taxonomy added to your post type.
The above code will register your custom taxonomy as a Hierarchical Taxonomy. It means, it will have a parent-child relationship and work like WordPress posts categories.
Non-Hierarchical Taxonomy
If you want to create a Non-hierarchical taxonomy then you have to make small changes in the above code. Then it will work like WordPress posts tags.
So, you need to set the value of hierarchical as false in the $args array variable to register your taxonomy as a non-hierarchical taxonomy.
You can replace the below code in your above function.
After replacing the above code, save your file and check it. Now it will work like standard tags taxonomy and you can make a tag cloud using the wp_tag_could() function to show all the taxonomy values.
Display Custom Taxonomy
You have successfully created your custom taxonomy. Now you can show them with your custom post type while listing a post loop.
You need to create a custom template and assign that template to a WordPress page. You can also create a custom shortcode function and hook that using the add_shortcode() function.
To create a custom template, create a new file inside your active theme folder and the following comment line code at starting of the file.
This code will tell WordPress that is a template file.
After this line, you can add your custom code to show the list of custom posts and taxonomies. See the sample code for getting the post data with taxonomy.
In the above code, we used the_terms() function to display the terms of custom taxonomy.
Parameter reference of the_terms() function:
- get_theID() : Post ID
- course_type : Taxonomy name
- Course Type : String to use before the terms.
- ‘| ‘ : String to use between the terms.
- ‘ ‘ : String to use after the terms.
Hope you understand all the code and learn how to create custom taxonomy in WordPress and you have created it successfully. If you still have any query please let me know in the comment section.


