
As you know, we may need a third-party library or packages to make a laravel web application and you have to install the packages. Adding laravel package can enhance your web application features and performance, it’s up to you.
But sometimes you realize that you only want that specific package and want to remove other packages from laravel application. Or if you accidentally install any package and then want to remove that package.
So in this tutorial, we will see how to install and uninstall laravel package that you have installed by the composer.
Composer is an application-level package manager for PHP applications. It manages the dependencies and required libraries for PHP-based applications. You can install, remove and upgrade the package using the composer.
See Also: How to Install Composer to Run the Laravel Application?
Install Laravel Package Using Composer
Let’s first see how to install laravel package using the composer. Then later we see how to remove it. To install the laravel package, you just have to know about the package name, then run the composer command with the package name.
Syntax
For example, let’s install the spatie/laravel-permission package, to install just run the following composer command in the root folder.
The above command will download the spatie/laravel-permission package files in your web application’s vendor directory. To be confirmed you can check the composer.json file, in this file composer will automatically list this package like the following.
Uninstall Laravel Package Using Composer
Now we will see how to remove the laravel package from our application that we don’t need anymore. So it is also very simple to uninstall the laravel package by using just one composer command.
Syntax
Let’s suppose we installed the above spatie/laravel-permission package by mistake and now we want to remove it completely from our application.
So run the following command as a reference to removing the laravel package from the application.
So the above command will remove all files related to that package and also remove the entry from the composer.json file, you can check it.
So use the above command to remove the laravel package but don’t forget to check your code and ensure you don’t need that package.
Remove providers and aliases
In some cases, when you install the package you also need to add the providers and aliases class in the config/app.php file.
And while removing that package, of course, you also have to remove unnecessary providers and aliases classes from the app.php file.
To remove the unwanted providers and aliases from the app.php file, you have to manually remove them. So open the app.php file inside the config/ folder and remove them.
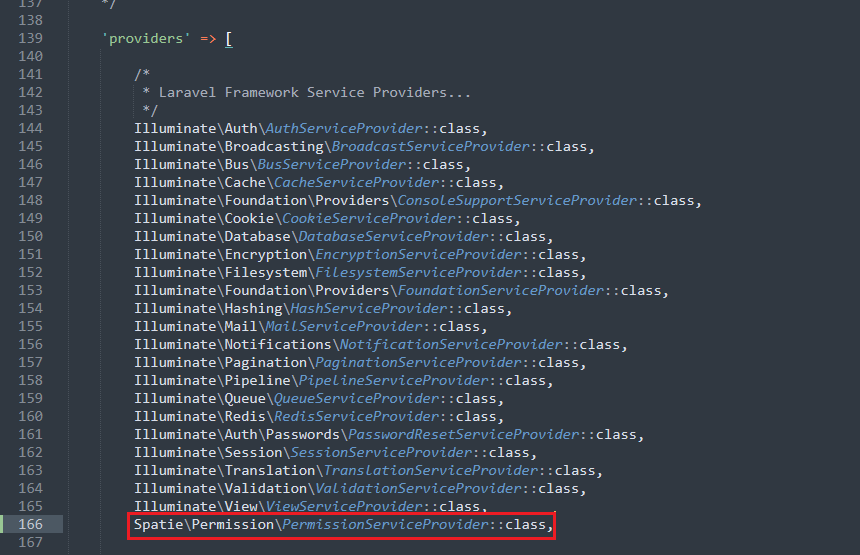
See the above image as a reference to the config/app.php file.
Conclusion
So you see how to install and uninstall the laravel package using the composer. Composer makes it easy for us to manage the packages and libraries that we need.
So simply install the package, run the composer command with require flag and package_name. And if you want to remove the package then run the again composer command with remove flag and package_name. That’s it.


