Laravel migration command helps to create the database table in your laravel project, so today in this tutorial, we will learn how to create a table in laravel using the migration.
Migration is just like the version control system for your database that allows your team can create and share the database schema.
If one of your team members do changes manually in database schema then you will get an error while doing the migration and pulling the data from source control.
The Laravel Schema facade allows you to create and manipulate tables so laravel migration use this facade to create and modify the database tables.
So I will guide you in this tutorial, how you can create the database table using the migration command. It’s not mandatory that you should have a specific version of laravel. It is the same for all versions like laravel 5, laravel 6, laravel 7, laravel 8, or any other.
See Also: How to Install Laravel 8 Framework?
Let’s start generating the laravel migration to create the tables.
Generate Laravel Migration
To generate the database migration, you have to use the make:migration command. It is an artisan command to create the new migration in laravel.
When you run this command it will create a new migration file in your database/migrations folder. The filename of migrations has timestamp so laravel system can sort them acccordingly.
As you can see in the above command, we used the make:migration command and specify the migration name as create_products_table.
You don’t need to worry about the table name, laravel will guess it automatically and pre-fill the migration file with the specified table name. If it was not able to determine the table name then you can add it manually in the migration file.
So after running the above command, you will see a new file like below in your laravel database migration directory.
As you can see in the above code, there are two functions in the migration file up() and down(). The up() function to create the table in the database and the down() function to reverse the migration if something wrong.
In the up() function, I have added some fields that I need for the product table, which you can add as per your requirements. Then added the timestamp for generating the created_at and updated_at fields in the table. You can also add the laravel validation in this migration file.
Now, will run the migration using the migrate command.
See Also: How to Create Laravel Migration, Modal, Controller and Resources in One Command?
Run Migration and Create Database Tables
Now, we have a migration file for the product table and we will create a products table in database now. To achieve this, you have to run the migrate command in your terminal.
Use the following command to create the table in database.
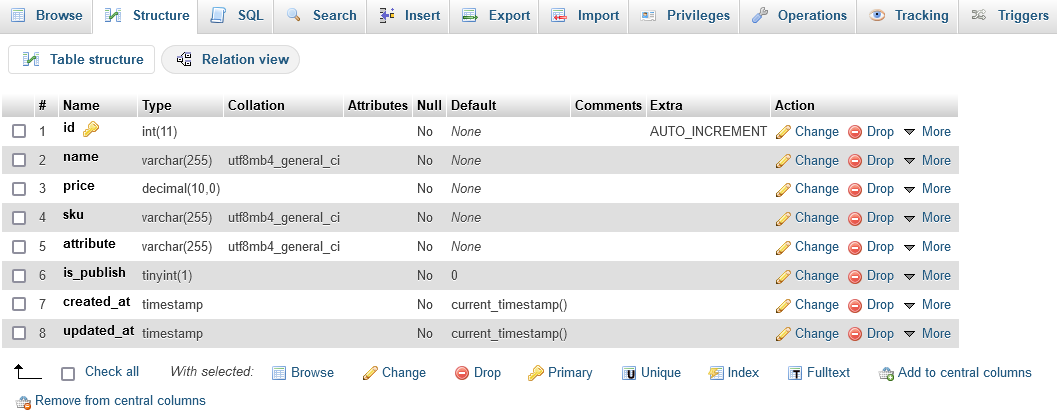
When you run the above command, you will see the new table has been created in your database. And all fields that you had specified in the migration file, were created in the product table.
See the following image of the table structure that I just have created.
That’s it for creating a table in laravel using the migration file. There are more helpful commands that will help you while creating migration and database tables in laravel.
Bonus: Migration Helpful Commands
As I said there are more helpful artisan commands that are useful in creating migration and tables. These helpful commands will help you to set the custom folder path for migration files.
And if something happens wrong while migrating, then you can roll back the database schema, so your original data will keep safe.
So let’s see what are those laravel helpful commands.
Create Migration with Table
If you want to generate a migration and create a table together then use the following command. Using this command, laravel will not determine the table name because you will specify manually in this command using the --table flag.
When you run this command, laravel first creates the migration file then creates the blank table in your database. Later, you can add the fields in the file and run the php artisan migrate command to dump those fields in the table.
Create Migration in Custom Path
If you want to set the custom path for your migration file then you can do this using the --path flag with make:migration command.
Make sure the custom path should be relative to your laravel application’s base path.
Run Specific Migration
As we created migration in the custom path using the --path flag, same we can use this flag with migrating command to run the specific migration file.
Rollback Laravel Migration
If you found something wrong in your database then you can roll back your migrations that you think these migration files causing issues with.
These are enough commands which will help to generate migration and create the tables in the database. For other migration commands, we will discuss them in another article in detail.
Conclusion
So, you learned in this guide, how to generate migration and create a database table in laravel using the make:migration command and migrate command.
You also learned about some other helpful migration commands that could be useful for you while creating the migration and table.


