WooCommerce is a powerful e-commerce platform, but sometimes you might need additional information from your customers during the checkout process. Adding custom fields to the WooCommerce checkout page allows you to collect specific data tailored to your business needs.
In this tutorial, we’ll guide you through the process of adding custom fields to the WooCommerce checkout page to enhance your checkout experience.
Add Custom Fields to the WooCommerce Checkout Page
To add custom fields on the WooCommerce checkout page, there are two ways, one is using the plugin and the second is using the code. We will explore both ways.
A custom field could be any type of field like text, textarea, number, drop-down, radio button, checkbox, email, etc.
Before proceeding to add a custom field, determine the additional information you want to collect from your customers. It could be anything from special instructions to personalized messages. According to requirements add that specific field type.
Let’s dive into it.
Add Custom Fields to WooCommerce Checkout via Plugin
To add custom fields via a plugin, we will use the Checkout Field Editor plugin by ThemeHigh. This plugin lets you add more than 20 different types of custom checkout fields to your checkout page. It is very easy to use and user-friendly. Let’s see how we can use it.
Step 1: First, download the Checkout Field Editor for WooCommerce plugin, and install and activate it. Check for more details on how to install and activate the plugin?
Step 2: Go to the WordPress Dashboard > WooCommerce > Checkout Form
Step 3: There are three tabs Billing fields, Shipping fields, and Additional fields. Select a specific tab where you want to add the custom fields.
Step 4: Click on the “+ Add field” button and enter the Basic details like type of field, label, name, placeholder, class, validation, etc.
Step 5: Save and close it. It will show the custom fields on the checkout page where you set the position.
Add Custom Fields to WooCommerce Checkout via Code
Now, we will see how we can add custom fields to the checkout page through coding. Using this way, it would be good if you have technical or coding knowledge.
Even If you don’t know coding, Don’t worry!!! I will explain each and every step and you can do it own very easily.
Note: This tutorial code will only work before the version of WooCommerce 8.3. In the latest version, WooCommerce introduces the block editor interface for the Cart and Checkout page. I will also make a tutorial in detail to customize the Cart and Checkout page with the WooCommerce block editor.
To customize the WooCommerce checkout page via code, follow the below steps.
Step 1: Take a Backup OR Create a Child Theme
I would suggest you take a backup of your files before making any changes. Or you can create a child theme and make all the changes in it.
Creating a child theme is a better option to avoid losing your modifications during updates. You can check the detailed tutorial on how to create a child theme in WordPress?
Step 2: Add Custom Fields Code in functions.php
Within your child theme, you’ll need to add some custom functions to modify the checkout page. Open the functions.php file in your child theme directory and add the following code.
// Hook to add custom fields to the checkout page
function custom_checkout_fields($checkout) {
echo '<div id="custom_checkout_fields"><h2>' . __('Custom Information') . '</h2>';
// Add your custom fields here
woocommerce_form_field('custom_field', array(
'type' => 'text',
'class' => array('my-field-class form-row-wide'),
'label' => __('Custom Field'),
'placeholder' => __('Enter custom information'),
'required' => true,
), $checkout->get_value('custom_field'));
echo '</div>';
}
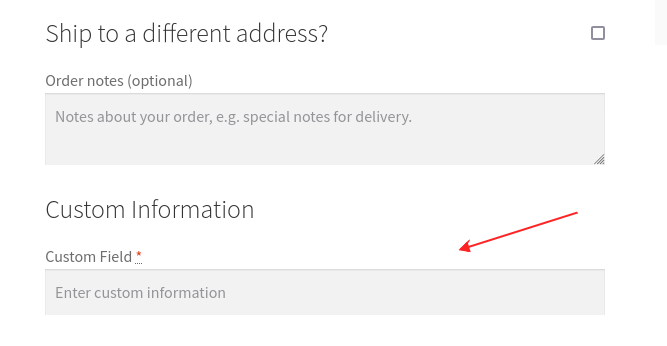
add_action('woocommerce_after_order_notes', 'custom_checkout_fields');This code adds a custom field to the checkout page. We used the woocommerce_form_field() function to add a custom field. You can customize the field type, class, label, and other attributes according to your requirements.
After adding the above code in the functions.php file and saving it. You will see the Custom Field section after the order notes.
You can also implement the custom validation on this custom field before saving it. To apply the custom validation on the custom field or in the existing fields check the tutorial on custom validation on the woocommerce checkout form.
Step 3: Save Custom Field Data
The above will only display the custom field on the checkout page. To save the data entered by the customer, add the following code to functions.php.
// Save custom field data to the order
function save_custom_checkout_fields($order_id) {
    if ($_POST['custom_field']) {
        update_post_meta($order_id, 'Custom Field', sanitize_text_field($_POST['custom_field']));
    }
}

add_action('woocommerce_checkout_update_order_meta', 'save_custom_checkout_fields');
This code saves the custom field data to the order meta, making it accessible in the WooCommerce dashboard.
Step 4: Display Custom Field Data in the Order Summary
To display the custom field data in the order summary after a customer placed the order, add the following code.
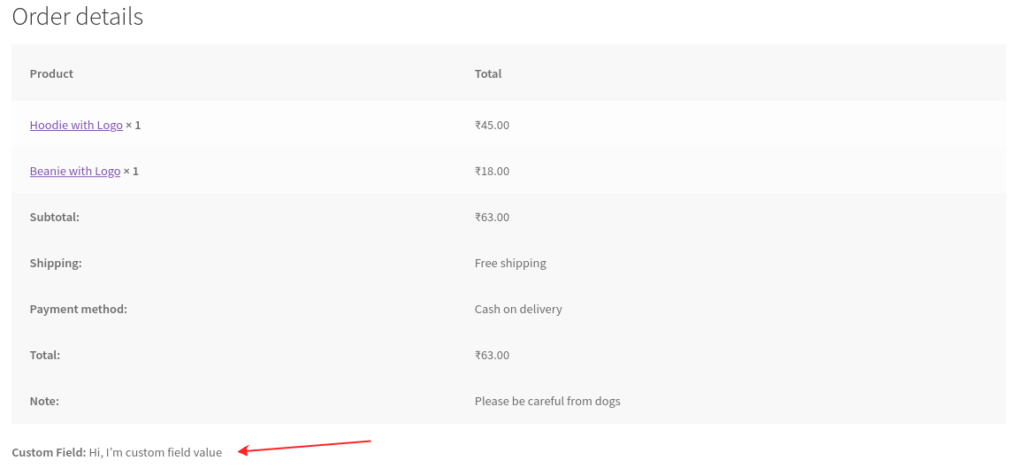
// Display custom field data in the order summary
function display_custom_field_in_order($order) {
    echo '<p><strong>' . __('Custom Field') . ':</strong> ' . get_post_meta($order->get_id(), 'Custom Field', true) . '</p>';
}

add_action('woocommerce_order_details_after_order_table', 'display_custom_field_in_order');
This code retrieves the custom field data and displays it in the order details. See the following image.
You can display it in some places, and there are some hooks that you can use to display where you want. The hooks are the following:
woocommerce_order_details_before_order_tablewoocommerce_order_details_before_order_table_itemswoocommerce_order_details_after_order_table_itemswoocommerce_order_details_after_order_tablewoocommerce_after_order_detailswoocommerce_order_details_after_customer_details
I will make a detailed tutorial on these hooks to display the custom field value in different places on the order page.
In case, you are redirecting to the custom thank you page after the order is placed then this code may not work. To make it work you have to implement this code in that custom thank you page template.
Step 5: Styling Your Custom Fields
Sometimes custom sections do not match the style with the current theme style, to match with your theme you can style your custom fields. Add CSS to your child theme’s style.css file and design it as you want.
#custom_checkout_fields {
    background: #f9f9f9;
    padding: 20px;
    margin-top: 20px;
}
Step 6: Display Custom Field Data in Admin Order Detail
To display the custom field value in the admin order detail page under the WooCommerce > Order menu, add the following code in your theme’s functions.php file and save it.
// Display custom field value in admin order detail
function display_custom_field_in_order_list($order) {
    $custom_field_value = get_post_meta($order->get_id(), 'Custom Field', true);

    if (!empty($custom_field_value)) {
        echo '<p class="form-field form-field-wide custom-field"><strong>' . __('Custom Field') . ':</strong> ' . esc_html($custom_field_value) . '</p>';
    }
}

add_action('woocommerce_admin_order_data_after_order_details', 'display_custom_field_in_order_list');
The code will fetch the custom field value from the order detail database table and show it in the order column like the following image.

Bonus: Add Custom Field to Billing and Shipping Section
If you have a situation where you want to add a new custom field in the existing billing and shipping form then you can also do that.
You have to pass the new fields type, label, class, priority, etc in the $fields array of billing and shipping.
Also Read: How to Remove Shipping / Billing Fields from WooCommerce Checkout?
To Add in the Billing Section
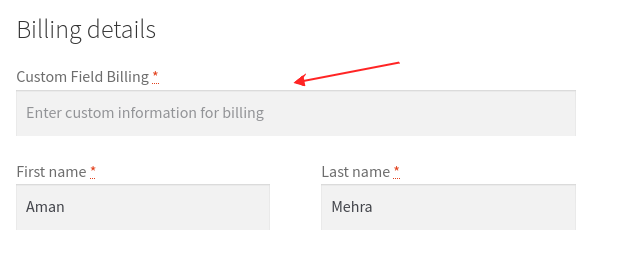
To add a custom field in the billing section on the WooCommerce checkout page, we will use woocommerce_checkout_fields filter hook.
// Hook to add custom field to billing address
function add_custom_field_to_billing_address_forms($fields) {
    $fields['billing']['custom_field_billing'] = array(
        'type'       => 'text',
        'class'      => array('my-field-class form-row-wide'),
        'label'      => __('Custom Field Billing'),
        'placeholder'=> __('Enter custom information for billing'),
        'required'   => true,
        'priority'   => 1,
    );
	return $fields;
}
add_filter('woocommerce_checkout_fields', 'add_custom_field_to_billing_address_forms');
Set all the required attributes as you want and add this code to the functions.php file. Remember, the priority attribute is used to set the field position in what order you want to display it on the frontend.
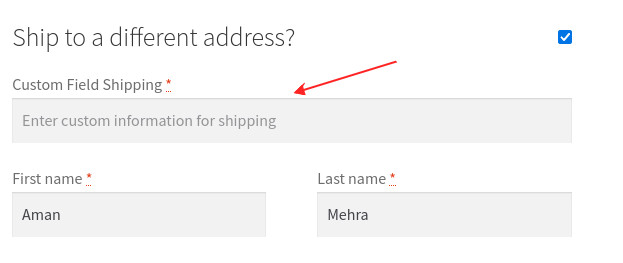
To Add in the Shipping Section
To add a custom field in the shipping section on the WooCommerce checkout page, we will use the same woocommerce_checkout_fields filter hook. See the following example.
// Hook to add custom field to shipping address
function add_custom_field_to_shipping_address_forms($fields) {
    $fields['shipping']['custom_field_shipping'] = array(
        'type'       => 'text',
        'class'      => array('my-field-class form-row-wide'),
        'label'      => __('Custom Field Shipping'),
        'placeholder'=> __('Enter custom information for shipping'),
        'required'   => true,
        'priority'   => 1,
    );
	return $fields;
}
add_filter('woocommerce_checkout_fields', 'add_custom_field_to_shipping_address_forms');
Save the code in the functions.php file and see the result in the following image.
Related Links:
Conclusion
Congratulations! You’ve successfully added custom fields to your WooCommerce checkout page. So, in this tutorial, you learned about how to add custom fields to the WooCommerce checkout page by using the plugin and code.
This customization allows you to collect specific information from your customers, enhancing the overall shopping experience on your site. Feel free to experiment with different field types and styles to meet your unique business requirements.
FAQs
Custom fields allow you to collect specific information from customers, tailoring the checkout process to your business needs and enhancing the overall shopping experience.
Creating a child theme is recommended to prevent the loss of modifications during theme updates. It ensures your customizations remain intact and functional.
Absolutely! The provided code examples can be adapted to add multiple custom fields. Customize the code to suit your requirements and collect diverse information from your customers.
Customize the appearance of your custom fields by adding CSS to your child theme’s style.css file. This allows you to seamlessly integrate the fields into your website’s design.
You can collect a wide range of information, such as special instructions, personalized messages, or any other details relevant to your products or services. The flexibility of custom fields makes it adaptable to various business needs.


