Do you know what is custom post type is and how to create it in WordPress? In this tutorial, you will learn how to create custom post types in WordPress and what it is and its uses?
Custom post types are the way to manage the different variety of content. By default WordPress only allow five types of content posts, pages, revision, attachment, and nav menu.
So creating a custom post type you can add more types of content to your website and manage it differently. It will be the different section menu from the default posts and pages post types.
You will learn two methods to create custom post types in this tutorial guide. The first method is using a plugin and the second is without using a plugin (manually code in functions.php file).
You can also use my WP Post Type Generator online tool to create a custom post type code and then paste it into the function.php file.
So, let’s get started.
What is a Custom Post Type in WordPress?
A custom post type is simply a normal post same as the default other post types (posts and pages). But the custom post type has different data values in the database.
To transform a standard WordPress website into a content management system (CMS), custom post types are used. And using the custom post types, you can manage different types of content.
You can make your own custom post type to show the type of material you want to show on your website. Like books, movies, reviews, items, products, recipes, courses, faqs, and many more you can create.
When you install WordPress then by default the following are post types that come with.
- Post: used for default posts
- Pages: used for create a static page
- Revision: used for store the post revision
- Attachment: used for the media files
- Nav Menu: used for the navigation menu
Here you can add custom post types to this list to represent your different types of content.
Let’s take an example.
If you want to make an online education-based website that has courses, then you would definitely create a courses section. So for this section, you need to create a courses custom post type.
This course’s custom post type will have different data values in the database and you can manage them easily. In this post type, you can also add custom taxonomies to organize your course data.
Why Need to Create Custom Post Type in WordPress?
As I already mentioned above it could be easy for us to manage different types of content and you want to show them on a different section of the website on the frontend.
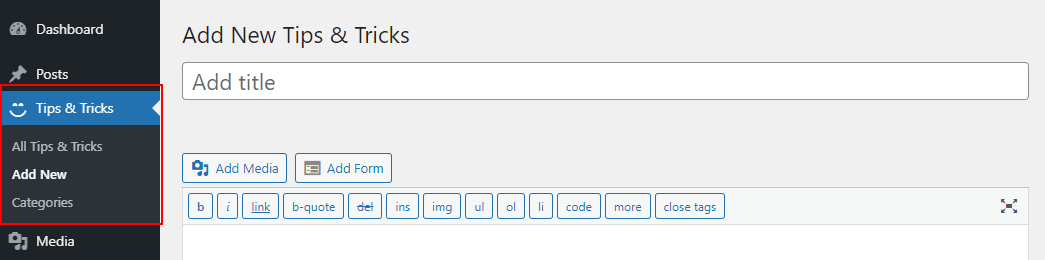
As an example, see my Tips & Tricks section. It is a different custom post type that I have created in my backend with custom taxonomy, you can see the following image.
Let’s start creating custom post types using two methods with plugins and without plugins.
Method 1. Creating a Custom Post Type – with plugin
Using a plugin is the simplest approach to create a new post type in WordPress. This approach is ideal for beginners since it is both safe and simple and you can easily create without digging into code.
I would also prefer this method if you are a beginner and don’t know how to coding. And please also take a backup of your website first while doing any customization.
So, let’s come to the point to create a custom post type with a plugin.
There are many plugins that allow creating custom post types by following their simple user-friendly interface. With these plugins, you can also create custom taxonomies for your custom post types.
The following are the best plugins to create custom post types.
- Custom Post Type UI
- Toolset Types
- Pods
- Custom Post Types and Custom Fields creator – WCK
- Custom Post Type Maker
You can select any of them as per your requirements to create a custom post type. All give you a user-friendly interface.
So in this tutorial, we will use the Custom Post Type UI plugin and learn how to create WordPress custom post types with this.
This plugin gives you an interface to manage all the custom post types and taxonomies that you have created with this. It gives the functionality to you, attach the custom taxonomies with post types and you can also make advance labeling for post types.
First of all, you need to install this plugin on your WordPress website. You can download it from here or you can directly install it through the admin dashboard. See our guide on how to install the WordPress plugin step-by-step?
After successful installation, you will see a new menu item (CPT UI) in your admin dashboard. So navigate to CPT UI > Add/Edit Post Types. It will show you the screen like the below image.
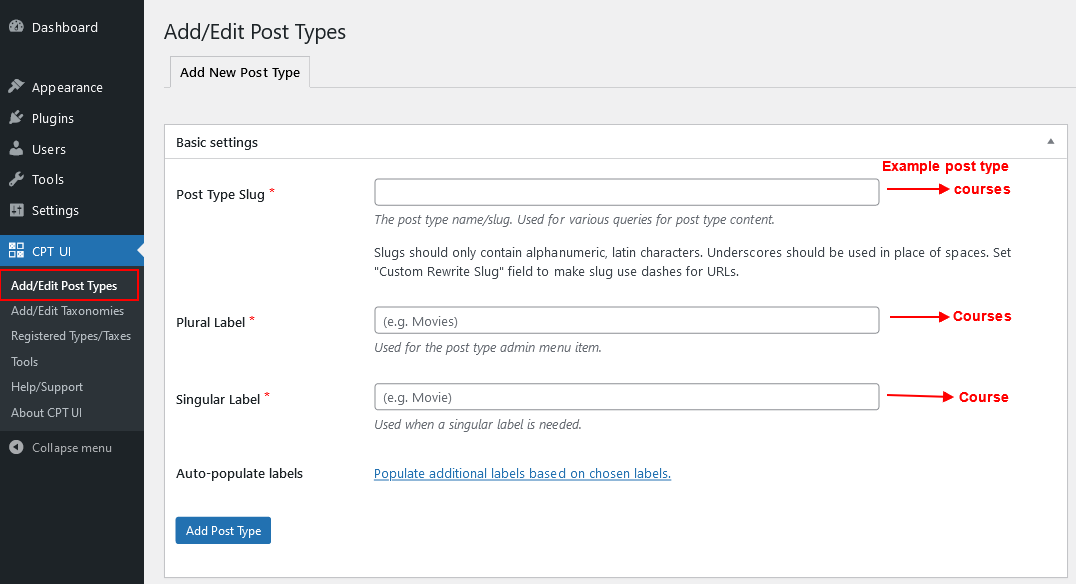
You will see the first section of Basic Settings about the what will be the post type name and slug.
So, in the first field “Post Type Slug”, add the slug of the post type that you want to create. This slug will be used in the URL to indicate the different post types from others. Like in the case of the tutorial, we will fill it as ‘courses‘.
After that, you will see the below two more fields Plural Label and Singular Label. These fields are about the name of your post type. In our case, the name will be ‘Courses’.
Next optional field about auto-populate label name in the additional fields. It means when you click on the link it will auto-fill the fields under the Additional Label section using the Plural and Singular label.
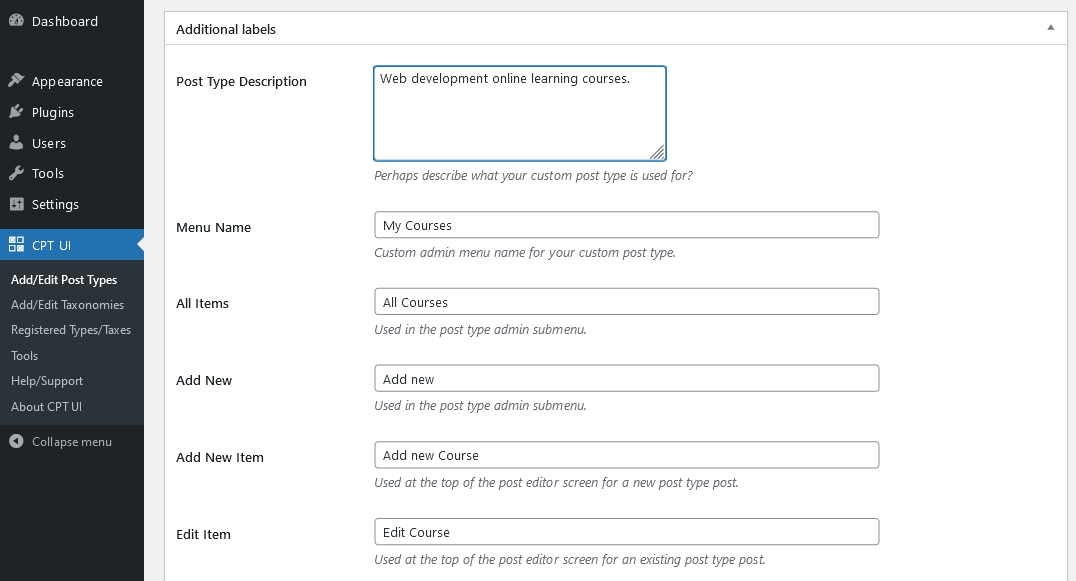
Now, scroll down and you will see the next section Additional Label. If you haven’t click on the “Auto-populate labels” field then you need to fill all the fields manually as you want.
But I would recommend to you click on that auto-populate link so it will fill automatically accordingly. These fields are used in the WordPress interface to manage the content. See the below image.
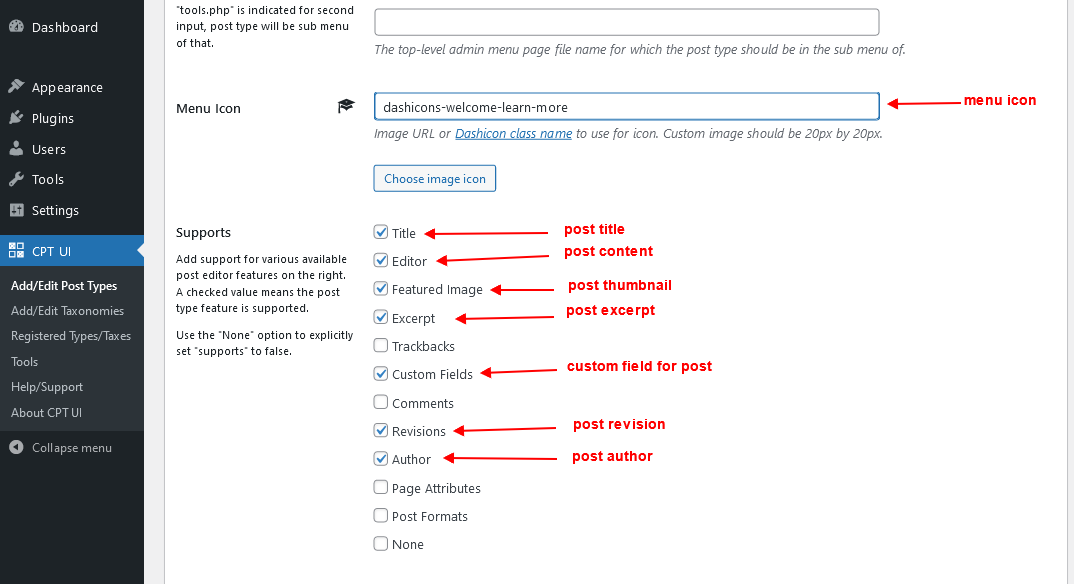
Next, you will see the Settings section for post types about the shown in admin UI, shown in nav menu, delete with the user, has archive page, Hierarchical for the parent-child relationship, show in the admin menu, menu position, menu icon, and what will support the post type be, and etc.
You can set up these settings as per your requirements. Each option explain next to it what it will do. So read the brief description about the field and set it up as you want.
I’m going with the default setting as per the tutorial case but except these settings. I made changes for menu position, menu icon, and supports the feature.
There is also a settings field for assign taxonomies. You can do that by creating new custom taxonomy. See our guide on how to create custom taxonomy in WordPress?
OK. Now click on the Add Post Type button and it will create custom post types for you and you see the new admin menu for post type like the below image.
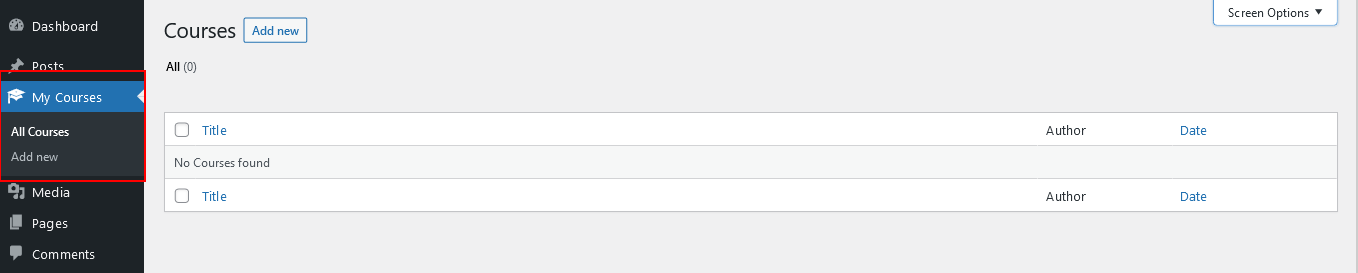
Hurray! you have successfully created your custom post type. Now you can start using it add the content for it.
That’s it!!!
Now, we will see how to create custom post types manually in WordPress using the code in the functions.php file. I would recommend using the child theme’s functions.php file for any customization. For details, see a tutorial on how to create a child theme in WordPress?
Method 2. Creating a Custom Post Type Manually – without plugin
In this method, we will create custom post types without using any plugins. We will do all code in the functions.php file of your active theme.
This method is for those who know a little bit about coding and how to do customization in WordPress. And this method safe the content for future purposes.
Because while creating the custom post type with the plugin is only one disadvantage is that if you deactivate the CPT UI plugin or delete it then your post type will disappear. Your data will be safe but the case is that you cannot access it from the admin menu.
OK. Let’s create with function to register the post type.
To create the custom post type in WordPress without the plugin, navigate to wp-content > themes > Your active theme > functions.php.
Add the following code in the file to understand the simple example of post type and how it works?
The above code will register the new post type courses with having some arguments options.
After saving the above code you will see the custom post like the same image as shown above when clicked on the Add Post Type button.
Now, let’s add the full code function for registering a post type. Use the init for the add_action() hook to register the custom post type.
See the full code block.
In the above code, the first part is for labels for post types and the second is the arguments that also taking the labels array data inside.
And some other more settings added to custom post type, you can look in details. We added supports features post title, post content, featured image, custom fields, and post revisions. You can set up these which you have need.
If you haven’t added the feature like custom fields, revision, or featured image you will not see these options while you adding your post in it.
Finally, register the ‘courses’ post type using the register_post_type() function. The above will register it the same as we did with plugins.
Display Custom Post Type
Now, you can show them on the front end by creating a custom page template in WordPress. Custom page templates give you full control and access to what you want to show on this template.
You need to just create a file in the theme folder and add the following line on top of that file.
After this line, you can add your custom code to show the list of posts. See the sample code for getting the post data.
Next tutorial you can read about how to create custom taxonomies in WordPress for your custom post type.
Hope you understand all the process and learn about how to create custom post types and you have created successfully custom post type in WordPress. If you still have any query please let me know in the comment section.


Your method of explaining everything in this piece of writing is really nice,
every one can easily understand it, Thanks a lot.
Glad you love it and was helpful for you.